


The 1 Trick You Need To Make Style Editor Changes Easier In Squarespace 7.0

Today’s hack is a life-saver if you ask me and will definitely save you quite a bit of time if you are just learning to design on Squarespace using the Style Editor Panel.
If you recently made the switch to Squarespace for your website, you are probably getting familiar with the platform. Don’t be too hard on yourself as learning a new platform always comes with a learning curve. I love using Squarespace because it’s intuitive and simple to design on, compared to Wix and WordPress. Squarespace users have the option of keeping their website simply using the drag and drop features, or using a little bit of CSS or code to further their design more. It’s also a one-stop-shop, meaning hosting, newsletters, e-commerce, blogging is under one platform and works seamlessly together. In comparison to Showit, however, I will admit Squarespace is lacking in the design flexibility realm and is a web designer’s dream. But as mentioned, each platform has its own limitations and it truly depends on your business’ needs and comfort level with technology.
Anyway, I can go on and on. Let’s get back on track.
So, what is the Style Editor Panel?
While a Squarespace template is the structure of your website, the Style Editor is the place where it houses the interior design elements — meaning the colours, fonts, sizes, and spacing of every Squarespace element. You will have the option of making “tweaks” to them, based on the features available with each template.
- For 7.0 Squarespace users, I suggest using the Brine Family templates as it has the most flexibility and capabilities within a template.
- For 7.1 Squarespace users, no need to worry about picking a template with the most features as they all have the same features.
As a new Squarespace user, the Style Editor Panel can get overwhelming to customize. Since there are so many features under one template, Squarespace hides some of the style features until the user has “activated” them (aka added it onto their site) to prevent further confusion. It’s definitely a feature I appreciate but being the planner that I am, I do prefer setting everything up from the get-go to reduce further back and forth edits between pages. This hack alone has saved me hours of playing around — so I want to share it with you today!
Roll up the sleeves and let’s get down to it!
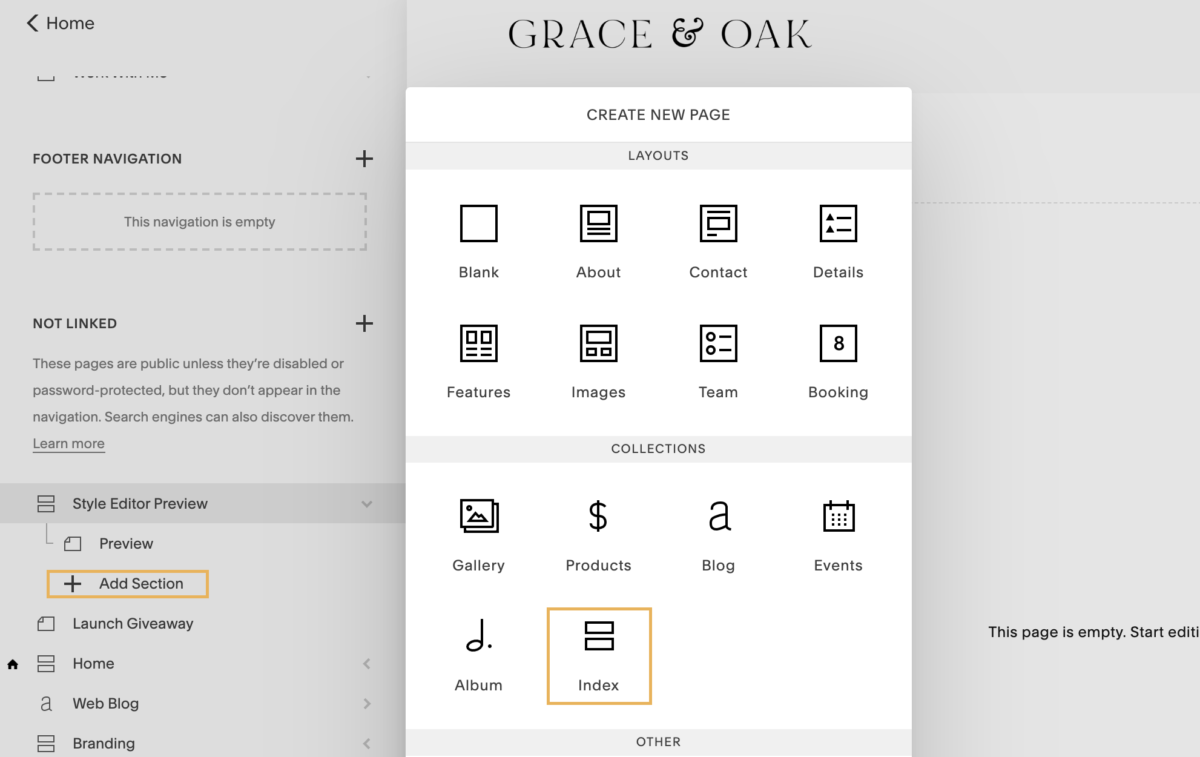
Create A Preview Page
You want to head on over to your Page Panel and add an Index page under the “Not Linked” section. This way, it won’t show up on your navigation areas. Name your page along the lines of “Style Edit Preview”. Once that has been created, click on “add a section” and add two pages. You can name them “Preview” and “Preview with a background”.
It’s important to use an Index page rather than a blank page for the purpose of this exercise. I’ll explain in details below.
Add Squarespace Essential Elements
With your preview page created, you will need to begin adding content blocks onto the page. To do so, click edit on the page, and you will see a line with an indicator appear. Click on the indicator, and the content block window will pop up.
The next part will take awhile to set-up, but I promise you, it’s worth it in the end! To make navigation easier, I have split this into four parts.
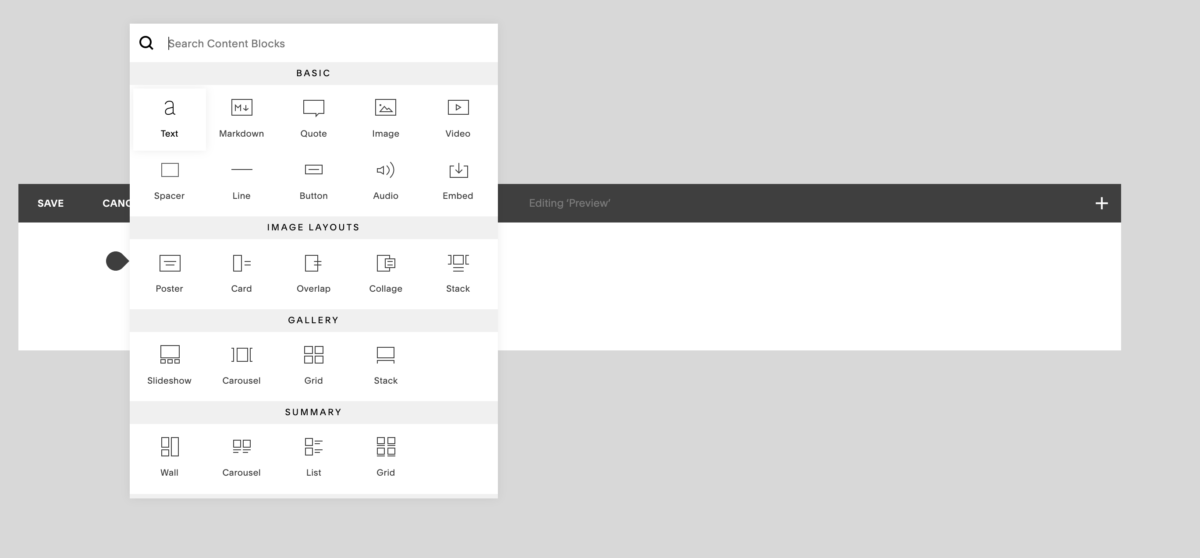
To start, here is a list of items you should add to this page:
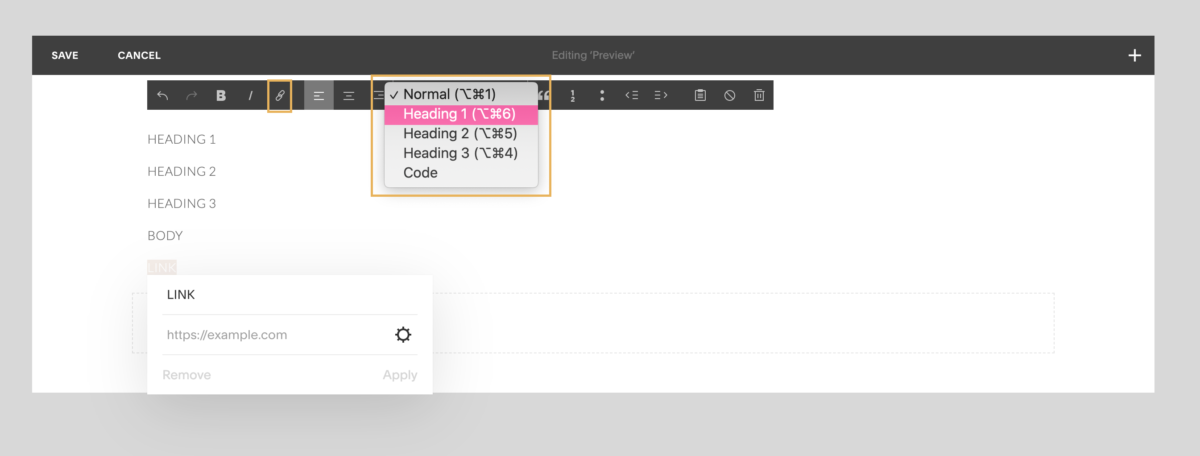
- Text Block – Heading 1
- Text Block – Heading 2
- Text Block – Heading 3
- Text Block – Paragraph (Body Text)
- Text Block – Paragraph (Link)
Make sure to set each text block to the relevant heading by using the black bar.
Next up:
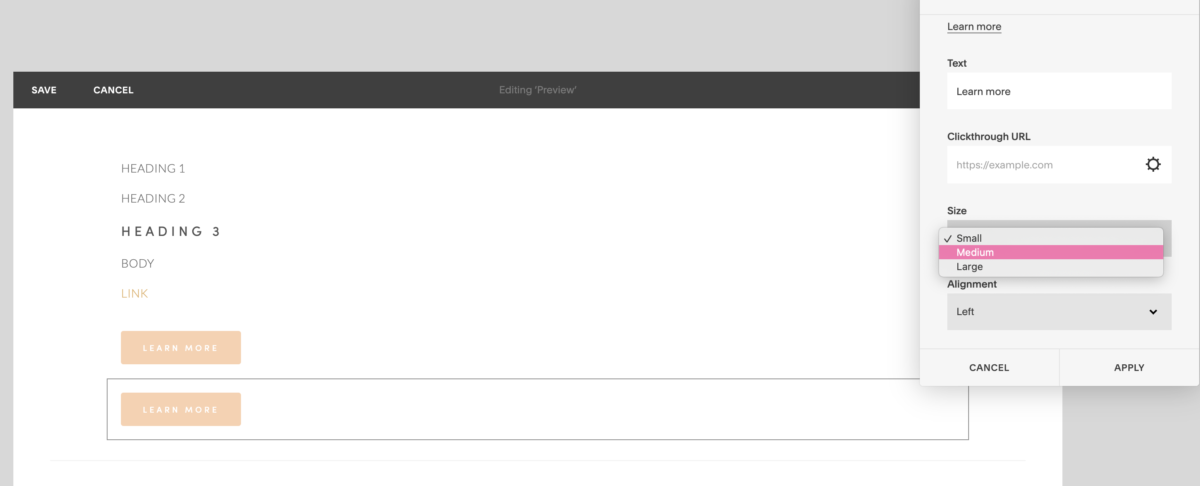
- Button (Small)
- Button (Medium)
- Button (Large)
- Quote Block
- Line Block
As for the buttons, please adjust the size accordingly so we can capture all styles later on.
Add Squarespace Optional Elements (I)
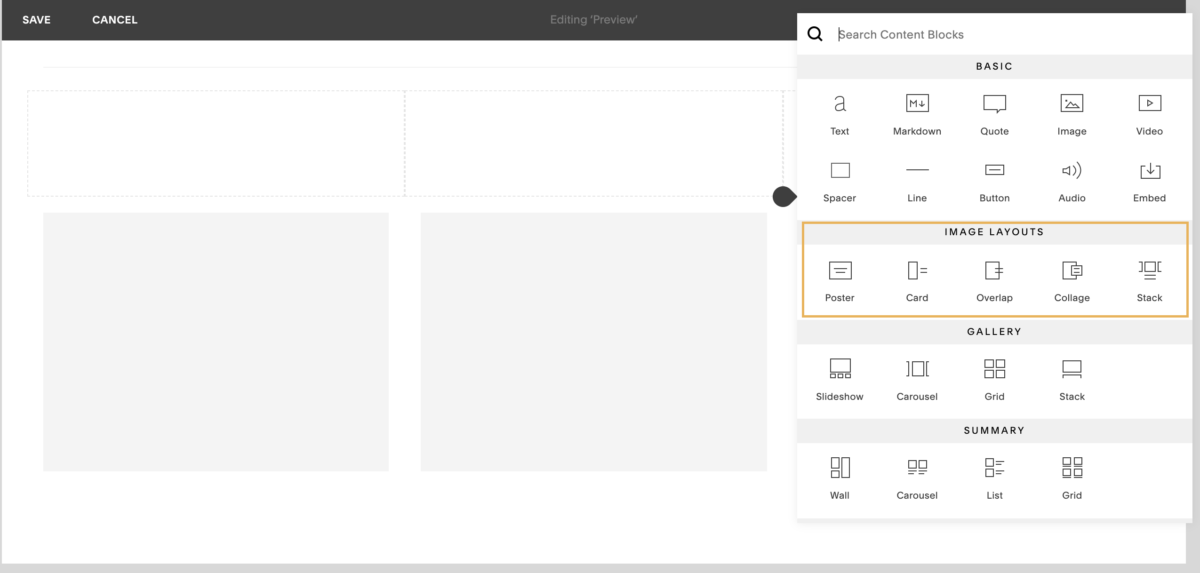
Once that’s completed, add three spacer blocks underneath your line. Then, under each spacer block, add one image layout block underneath. as shown below.
- Poster Block
- Card Block
- Overlap Block
- Collage Block
- Stack Block
Remember to upload a photo with each of these blocks, as well as fill out the title & subtitle components.
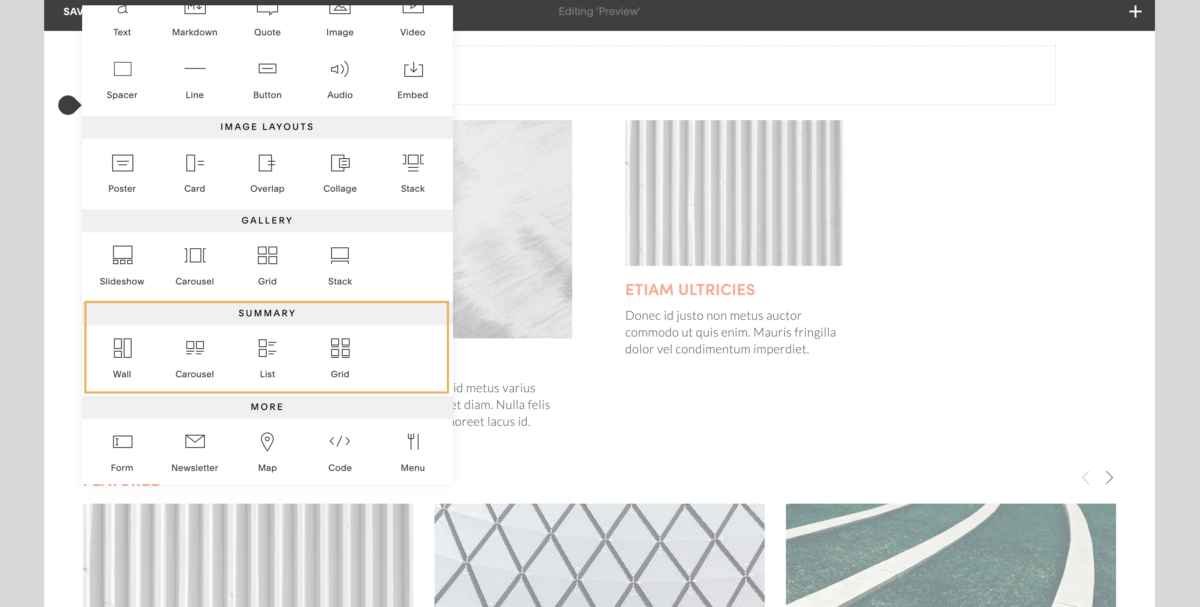
Once that’s completed, add one spacer across, and then insert each one of the summary blocks options.
- Wall Summary
- Carousel Summary
- List Summary
- Grid Summary
Add Squarespace Elements (II)
Okay, halfway there! Remember that “Preview with Background” Section that we added at the very beginning? That’s where we are working on next. So click on that section, and instead of clicking on Edit on the black bar right away, click on Banner. This is where you will be adding a background image to this section.
I suggest uploading an image of a coloured background, or an image that’s not busy at all so that you can see the different elements on top.
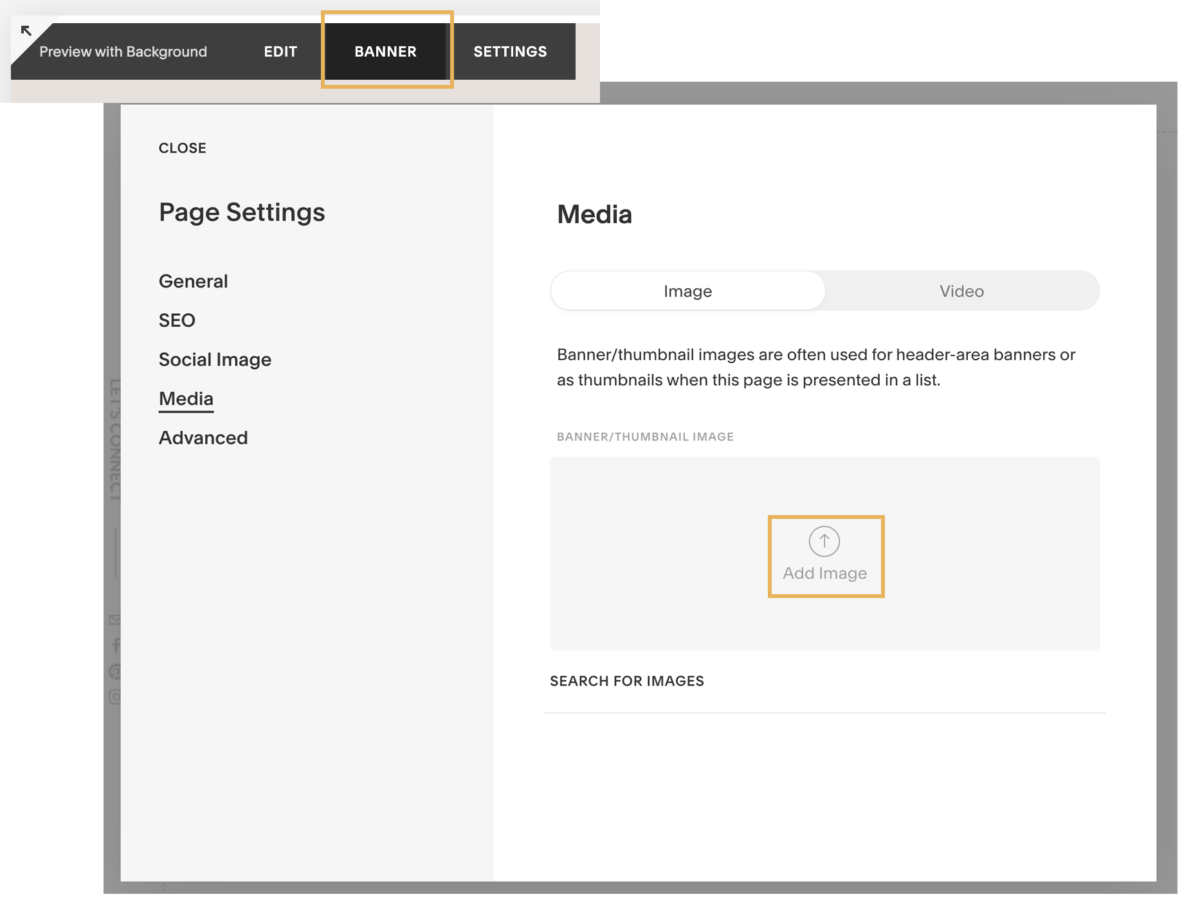
Once the background image is uploaded, you are going to repeat Step 2 above with inserting the Squarespace Essential Elements (i.e. text, buttons, line, etc.). No need to worry about the image layouts or summary block.
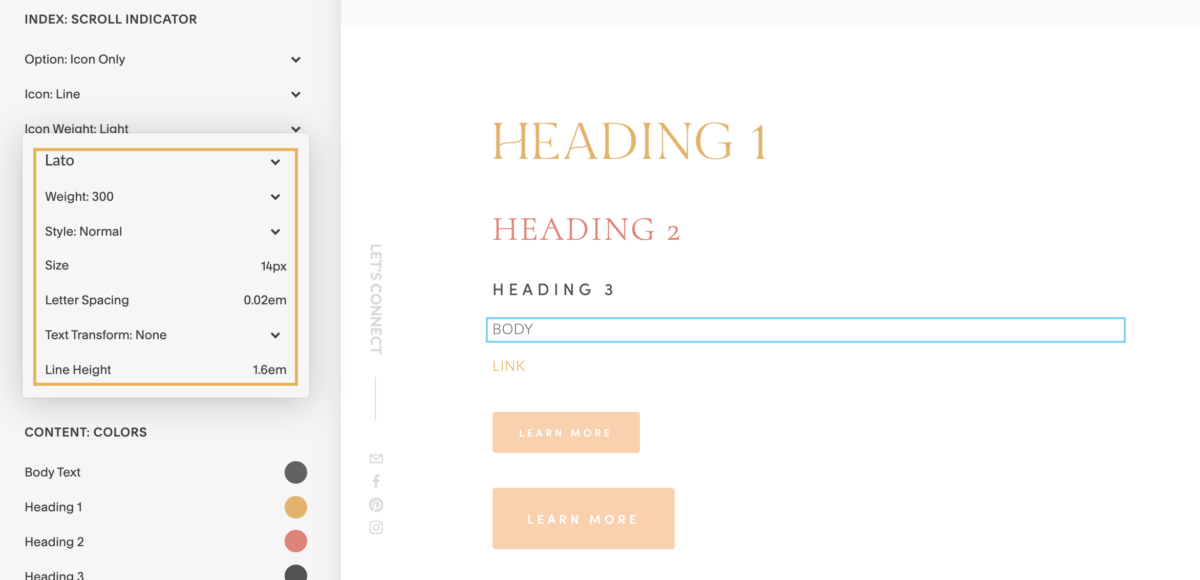
Designing In Style Editor Panel
Alright, now the fun begins! Once your page is saved, head on over to the Style Editor Panel to the left (Design > Site Styles). Immediately, you will see a whole lot of style settings to adjust.
The reason we created the Style Edit Preview page is so that it becomes easier to edit the different elements without having to toggle back and forth pages. By setting elements up properly at the beginning, you will be able to edit everything at once. Not to mention, you will also get to see how the hierarchy of your font pairings and your brand colours in action!
To edit each element, hover and click on the blue rectangular box that appears. The Style Editor Panel will bring you directly to that element. For text blocks, you will be able to customize font, weight, style, size, spacing, and more. Depending on what element you are editing, you will also have the flexibility to format shapes and sizes. To customize colours (fonts, buttons, lines, etc.), you can easily paste in your brand colours’ Hex code (#FFFFFF).
When you start working on the “Preview with Background” section, you will notice that you can customize those elements completely. I recommend keeping your brand colours in mind or selecting images that work well with the overlay colours you have selected.
For example, although your body paragraph colour is black. Chances are if you were to upload a burgundy background, black won’t show up very easy to read. Therefore, Squarespace is giving you an option to have a different colour when you upload background or images.
There you have it! Hopefully, that sets you and your website up for success when designing in Squarespace.
Of course, this is barely scratching the surface when it comes to customizing your Squarespace website but it’s a nice start to get everything rolling! As you insert more elements onto your site, more features and customization will become available (i.e. e-commerce products, blog, etc.).
Designing a website takes a lot of time, energy, and strategy. It’s important to plan in advance before diving in — otherwise, you will end up having to do a lot of editing and formatting in the long run. If you want to save yourself some time and precious energy, let’s have a chat to see how I can help!
Shop Showit Website Templates
No Coding • Drag & drop • SEO optimized

")
Someday
Editorial, Edgy, Minimal
View demo

Joelle
Artistic, Striking, Refined
View demo


Adrienne
Modern, Fresh, Cool
View demo


Designed By Yours Truly 🤍
